I have compiled a list of Fusion 360 tutorials, tips, tricks and shortcuts that I have collected over the years of using Fusion 360 and it’s all listed here.
These tips are from sketch environment, part modelling, software features and sculpting workspace.
Sketch Workspace
All the tips here are related to creating and modifying sketches in the sketch workspace of Fusion 360.
Tip 1: Repeating the last command
To repeat the last used command in Fusion 360 simply right-click hold your cursor and drag your mouse up as shown in the GIF image below.

Tip 2: Converting line into an arc
When making a line using the line command go to the endpoint of the line again when the command is active and hold down the left mouse button and move it outwards, it will now create an arc if the mouse click is pressed.
Let go of your mouse and click again to make a line. Take the reference of the attached animated gif image for more.

Tip 3: Temporarily disable snapping
When making drawing in the sketch environment Fusion automatically snaps to nearby reference points.
If you want to temporarily disable the snapping to the nearest points, then press and hold the ctrl key and it will stop snapping to any point if ctrl is pressed. Release ctrl to activate snapping again.
Tip 4: Converting text to geometry
To convert a text into a geometry object you need to explode it which can be done by selecting the text and selecting the explode text option from the right context menu.
For extruding the text “explode text” is not needed and a text can be extruded even without exploding it.

Tip 5: Adding dimension from centre vs tangent
When you add distance constraint between two circles it adds constraint between the centre of the circles.
If however, you want to add constraint between points of tangency then select the D command (for dimension constraint) then right-click and select “Pick Circle/Arc Tangent” from the context options.
Apply the constraints again with this option and this time it will be added between tangent points and not the centre.

Tip 6: Converting sketch into construction geometry
To convert a sketch into construction geometry simply select the sketch in the sketch environment and hit the X key from your keyboard and the selected sketch will be converted to construction geometry.
Tip 7: Forcing midpoint selection
When adding a dimensional or geometric constraint if you want to select the midpoint of a line or an arc then select the constraint press and hold the shift key then move your cursor close to the midpoint area of the geometry and the cursor will snap to the midpoint as shown in the animated gif below.

Tip 8: Keeping sketch active
When making a sketch like a line or a spline when you double click it stops the current sketch but keeps the command active so you can make the same sketch again without selecting it.
Tip 9: Adding sketch dimensions automatically
If you want to add dimesons on the drawing automatically as you sketch them, use this method. Start sketch command like line then move it in the direction you want then type the length then press the tab key.
It will take you to the next option which is the angle, type the angle and left-click then repeat the process for the next part of the sketch and so on.
Once you are done making the sketch press the ESC key and now the sketch dimensions are added automatically.
Tip 10: Moving the sketch plane
If you’ve created a sketch on a plane and later want to move it on a different plane then simply select the sketch from the browser or the timeline and then right-click and select the “Redefine Sketch Plane” option.
Select a new plane where you want to move this sketch and now we have it on a different plane.
Tip 11: Breaking sketch
Using the break option you can break the sketch using another sketch as a reference and then convert the part of that sketch into construction geometry if needed.
To use the break tool select it from the modify panel as shown in the following animated GIF and then click the sketch you want to break.
It will break the selected sketch with respect to the other sketches’ closest point to where you clicked, repeat this process to break the sketch into more parts.
Once the sketch is broken select the segments of the sketch you want to convert into construction geometry and then press the X key on your keyboard.
Tip 12: Aligning sketch automatically to view direction
When making a sketch on any plane the sketch will automatically align with respect to your view direction.
Sometimes this may not happen and if it doesn’t then you can make the sketch plane align using the method shown here.
Go to “Preferences” then the “Design” option then “Auto look at sketch” and click OK to accept the changes.
Now the sketch will auto-align as shown in the following video.
Tip 13: Making a tangent line directly on a circle
When you want to make a tangent line directly on a circle then start with the line command and press and hold the shift key and then click on the circle.
Don’t let go of your shift key yet and then click at the second point where you want to drop that tangent line.
A new line that is tangent to the selected circle will be made and the tangent constraint will be applied automatically to it.
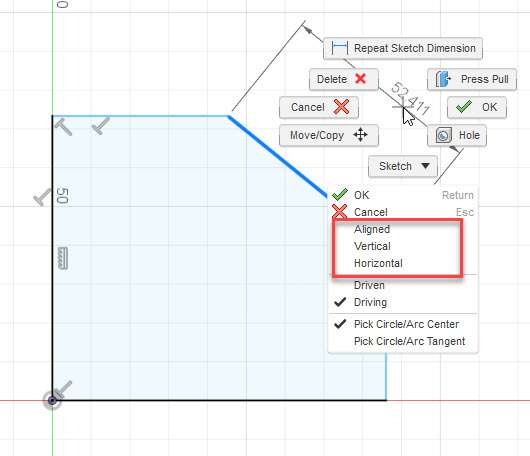
Tip 14: selecting dimension alignment
When adding a linear dimension you can select the orientation for the dimension from right-click menu.
So, for the aligned dimension shown in the following image add the dimension using the D command and when the command is active right click and you will get the options like Aligned, horizontal and vertical.
Select the one you want for the dimension and it will align accordingly.
Tip 15: Using existing dimension as a reference
When adding dimensional constraints to a sketch you can use an existing sketch dimension as a reference.
As an example in the following image, we want to make the diameter of the circle half of the width of the rectangle.
For that, you can add the length and width of the rectangle in the drawing using the dimension command D and then click the circle to add its dimension.
Now instead of typing a number for the circle diameter simply click the width dimension from the rectangle and the dimension tag d2 will show up for the diameter.
Now you can leave this value as d2 and the diameter will remain equal to the width of the rectangle or you can add a formula like d2/2 and the diameter will now become half of the rectangle’s width.
You can do the same for multiple dimensions in the sketch too.
Tip 16: Verifying fully constrained sketch
To identify with absolute certainty if your sketch is fully defined check the padlock icon on the sketch feature in the browser.
The simple method of moving the sketch to identify if it’s fully defined works for most cases but may not be a foolproof method so checking the padlock icon is best.

Part Modeling Workspace
In this section, I have added tips that are related to the part modelling workspace of Fusion 360.
Tip 17: Selecting hidden features
When objects like planes etc are obscured by other objects and you want to select the hidden objects then click and hold your cursor above overlapping objects.
You will get a menu of overlapping items, select your required object from this list. Take the reference of the following animated image for more.

Tip 18: Shortcut panel
When you type S in the sketch environment or 3D environment a shortcut panel will show up.
You can quickly start a command from this panel or search for the commands using the command name and you can even pin the frequently used commands on this panel for quick access as shown in the animated gif image below.
To remove a command from this panel simply drag it and drop it outside the panel.

Tip 19: Slicing 3D object to see the sketches
When making sketches on planes obscured by other 3D geometries you can slice the part which is above the plane of construction by selecting the slice option from the constraints panel while in the sketch environment as shown in the animated gif image below.

Tip 20: Quick measurement of features
To quickly measure the length, angle or other dimensions of a sketch or feature you just need to select it and the feature size will show up on the bottom right corner of the screen.
If you select multiple features then you will get the total length, the distance between features, the angle or anything else that is applicable to your selection.
Tip 21: Showing sketch dimension in 3D
You can show the sketch dimension in 3D view and you can even make edits using these dimensions directly in 3D.
To do that go to the sketch from the browser then right-click and select “Show dimensions” as shown in the following image.

If the dimensions are not showing up even after activating then turn ON the visibility of all the sketches (eye icon for all sketches and sketch folder).
After activating the sketch dimension will look like the following image.
Double-click on the dimension you want to edit and you can make changes to it.
Tip 22: Adding fillets to all feature edges
When adding fillet or chamfer to a feature like an extruded block simply select the extrude feature from the browser or timeline and all the edges of that feature will be selected.
You can then apply the fillet or chamfer of the same dimension on all the edges of that feature.
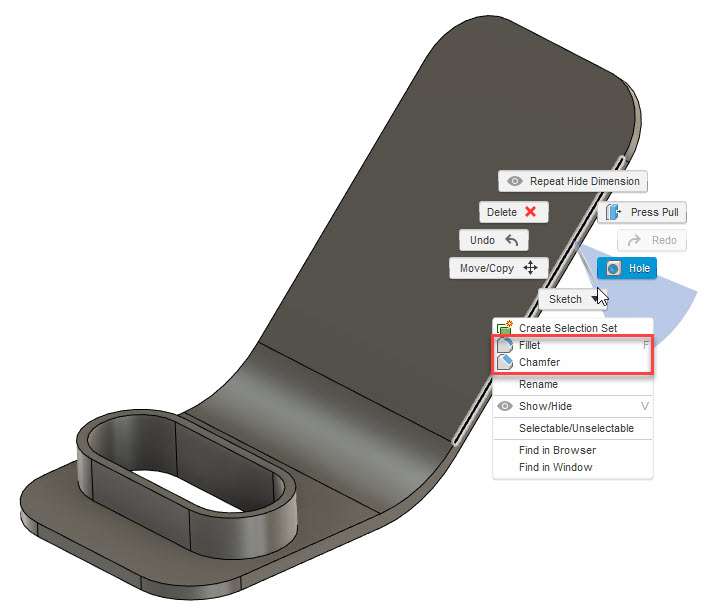
Tip 23: Relevant command for a feature
Select any feature from your 3D part like an edge and then right click and it will show the commands like fillet and chamfer that are relevant to that edge.
If you select a face or plane then right-clicking will reveal the commands that are relevant to that face or plane and you can directly select that command from the right-click menu.
Tip 24: Changing dimension reference plane
When using extrude, move face or similar commands you can change the reference points that are used for measuring the height of extrusion or face offset distance.
To do that select a sketch feature or face then select extrude and by default, the extrusion will start from the face on which the sketch exists.
To change the reference face that is used for dimension measurement click the three-dot icon on the dimension as shown in the following animated image and then select “re-anchor”.
Now select a new face and the extrusion distance will be defined with respect to the new reference.
Tip 25: Using one sketch for multiple features
You don’t need to create multiple sketches for all your part features and you can create a simple sketch and create multiple features with it using the island selection.
To do that make a sketch with details as shown in the image above and then select the feature you want to extrude.
After the first extrusion, the sketch will auto-hide but show it again from the browser and then you can use another part of the same sketch for a new feature.
Software Related Tips
The tips in this section are related to Fusion 360 software customizations.
Tip 26: Fit the part in your drawing area
This might seem simple but double-clicking your middle mouse wheel will fit your drawing in the current work area. So, no matter where your sketch, part or component is in the drawing double clicking will fit it in the visible space.
Tip 27: Add a short key for a command
If you use a command very frequently then you can add a shortcut key for that command.
As an example, let’s assume that I use the Mirror command quite often but it has no shortcut key assigned to it by default.
So, go to the mirror command from the Create panel of Sketch environment and then click the three dots right next to the command and select the “Change keyboard shortcut” option as shown in the following image.

Now assign a shortcut that you want by pressing the key, as an example I am using CTRL + Q for this shortcut (CTRL + M is already a reserved shortcut for minimize so fusion will show a warning that it can’t use that) then click OK and now we have a new shortcut for mirror tool.
Tip 28: Toggle selection method
To toggle between the type of selection methods like a window, freeform and paint selection use the keyword keys 1, 2 and 3 respectively.
Pressing 1 will activate window selection, 2 will activate free form selection and 3 will activate paint selection.
Tip 29: Toggle visibility
You can toggle the visibility of an object, body, component, plane, sketch and more using the V key.
Simply select the object from the drawing area that you want to hide then press the V key and the selected object will hide.
To show the object again click the eye icon next to the object in the browser as shown in the following image.
Tip 30: Navigation preference from other software
If you are a Solidworks, Inventor, Autodesk Alias, PowerMill or TinkerCAD user then you can use the same Pan, Zoom and Orbit shortcuts that you use in your software here in Fusion 360 as well.
Go to preferences > General tab then change the “Pan, Zoom, Orbit shortcuts” from the menu as shown in the following image.

Once you select a software setting the navigation tools in Fusion 360 will work like the software you’ve selected in settings.
Sculpting Workspace
Tips in this section are related to free-form modeling often known as sculpting workspace as well.
Tip 31: Making edges straight
When the edge of a form feature is not completely flat you can flatten it using the scale option.
Select the entire edge by double-clicking on it then click the Scale hotspot from the gizmo and move its value all the way down to zero and that will flatten it.
Tip 32: Selecting loop of faces
To select the loop of faces in form features select a face then press and hold the shift key and double click the adjacent face and that will select the entire loop.