
IN THIS ARTICLE
Divide AutoCAD objects into equal parts – Review
Using DIVIDE and MEASURE commands of AutoCAD you can divide 2D drawing objects like Line, Polyline, Arc, Spline and Ellipse in equal parts without knowing their length.
These commands will not split the geometry instead at every division a point will be added. The commands can be used on open geometries like an arc and also on closed geometries like a circle.
DIVIDE command:
In order to divide the geometry into a fixed number of divisions use DIVIDE command. For our case, I will use a spline.
Select Divide tool from expanded Draw panel of Home tab, you can also use its command equivalent DIVIDE. Click on the spline and enter the number of segments in which you want to divide the spline, I will select 6 segments for our case. Press enter to exit the command.

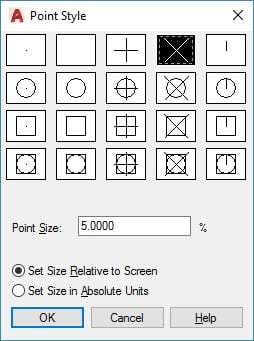
You will see no visible changes on the spline, to see the changes type DDPTYPE and press enter. This will open Point Style window, select a visible point style from this window and click on OK.
You will now see points on the spline that divide the entire geometry into six equal segments.
Blocks for Division:
You can also use blocks instead of points at the division points of the geometry. In order to use the blocks start DIVIDE command select the object and click on Block from options of the command line as shown in the image below.
Type name of Block and press enter again. If you want to align the object with respect to the geometry select yes from the next prompt else select no. Specify the number of segments in which you want to divide the geometry and press enter.
You will notice that an instance of selected block will be added at the point of division of the geometry.
MEASURE command:
MEASURE command can be used in the situations where you want to divide the object into segments of known length.
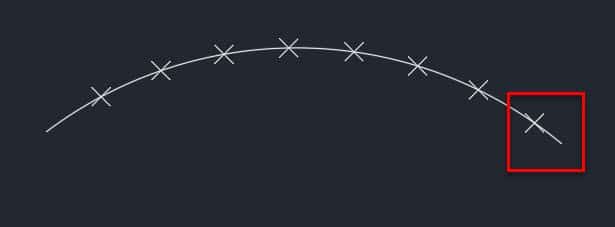
For example, if we have an arc and we want the arc to divide in such a way that each segment is equal to 3.6 units then this command can be used.
However, there is a limitation with this command when you use this command on any geometry the length of the last segment may or may not be equal to the length assigned by you.
The last segment length depends entirely on the remaining length of the curve after performing the divisions as shown in the image below.
For example, if you use measure command to divide a line of length 9 units in a segment length of 2 units then the line will be divided into four equal parts of 2 unit length but the last segment will be 1 unit in length.
To use this command select MEASURE tool from expanded draw panel of Home tab, you can also use its command equivalent MEASURE.

Select the geometry and type the length of segment and press enter. You will notice that a node will be added at each division points similar to DIVIDE command. In this case, as well you can use blocks instead of points.
Do you have questions related to this tip? Let me know in the comments below.
Great !!
Is there a way to divide a 3D line in a 2D dimension. For example I have a 3d polyline which is the top of a sheet pile wall. This is 3d so the vertical distance changes therefore if i just use MEASURE it works along the length. The sheet piles would be placed horizontally and are 1.4m wide so I would need to divide it 1.4m horizontally which is not going to be the same along the length of the line.
When I use the DIVIDE action and set the DDPTYPE to how I like, I am unable to draw a line from these segment points. I have all of my object snapping on, my polar tracking on, but it will not let me start drawing a line at these points. Please help as I need to have this figured out before tomorrow! Thank you!
When I use the DIVIDE action and set the DDPTYPE to how I like, I am unable to draw a line from these segment points. I have all of my object snapping on, my polar tracking on, but it will not let me start drawing a line at these points. Kindly help on how to draw lines from these points.Thank you!
I had the same question. After I switched on the Snap to Node, I am able to draw a line from these segment points. The snapping point should appear as a green circle.
please why the line is changing to a dashed line when i select it . this creates many problems , well, the square with a circle above is considered as a SPLINE !!!!! i need help
i need actuall command for mesure and divide in AutoCAD
how can we divide area of trapezium into equal number of parts (area) in autocad
In comand measure how to select the start direction of line?
HOW I divide area in autocad 2018 without any additional software?
haw to eual devide a rectangle box
how can we divide area of trapezium into equal number of parts (area) in autocad
How can I arrange equal trapezoidal in arc with keystone
I Have only been using AutoCAD for a week now and trying to learn basic of it. Getting some trouble as I just wanted to divide a circle into several equal segments, how can this be done. Can you please help?
Thanks in advance!
In your video there is a yellow circle underneath the mouse pointer and a red circle appears when the mouse clicks on something. Will you please tell me how i can activate these mouse pointer effects? I am running auto cad 15. I have looked at all of the ribbon tabs and cannot find out how to do this. Thanks you.
That feature is in screen recording software with which I created this video its not an AutoCAD feature Robert