
Everything about LOFT command of AutoCAD
LOFT is one of the most basic 3D commands which is generally used for making complex and even organic shaped geometries with relative ease.
This command works in a little different way and you need to be fully aware of AutoCAD UCS related tools to take maximum advantage of the LOFT Command.
Making Simple LOFT
Let’s start with the most basic feature of this command. Here we have three different geometries on different but parallel planes.

To convert it into 3D, select the LOFT command and select the objects in the lofting order. The selection of lofting order decides the final geometry and using the same set of geometries you can make different 3D shapes by simply altering lofting order.
In the first case, I will select the circle on the bottom followed by the square in the middle and then finally circle on the top and then press enter twice. This will make geometry as shown in the image below.
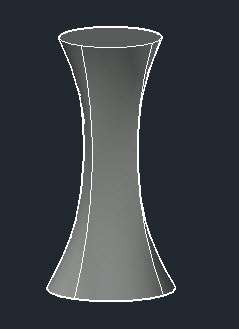
Press CTRL+Z a couple of times to get back to the previous 2D drawing and once again select the LOFT command. This time I will change the lofting order.
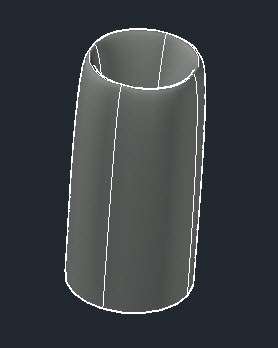
Click on the circle at the bottom of the geometry then the circle on the top and finally click on the square at the center of the three geometries. The resulting shape will be like the one as shown in the image below.
As you noticed, in both cases the LOFT command followed the order in which you click on the objects to make the 3D shape and hence you need to ensure proper lofting order for making the geometry.
Adding Path
The shape of the 3D loft is decided by the geometries which you select in a lofting order but can add Guides and Path to control the 3D geometry with more precision.
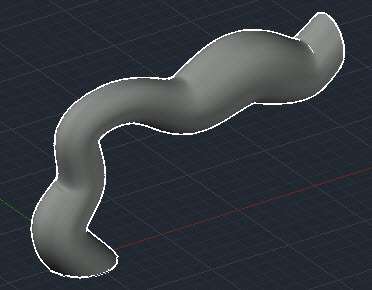
In this example, we have many circles along different planes and we have a spline passing through all the circles as shown in the image below.

Once again select loft tool and select the circles starting from the circle on the horizontal plane and select them in linear order. Once you have selected all the circles’ press enter and you will see a preview of loft shown in the image below.

Select path from the options of the command line and select the spline which is passing through the center of the circles. You will notice that the 3D geometry will change to take the shape of the path which you have selected. The final lofted 3D geometry will look like this.
Adding Guides
In the previous example, we have selected a path for making our 3D geometry. In this example, I will tell you about controlling the geometry with more precision using guides.
In this case we have two splines passing through the quadrants of the three circles which are placed on different but parallel planes.
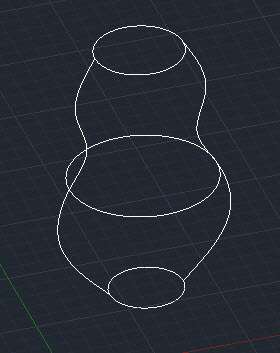
Start loft command and select the three circles in the lofting order from bottom to the top and press enter. Now select the guides option from the command line and select both splines from the geometry.
You will notice a lofted geometry which follows the guide curve as shown in the image below.
More about LOFT
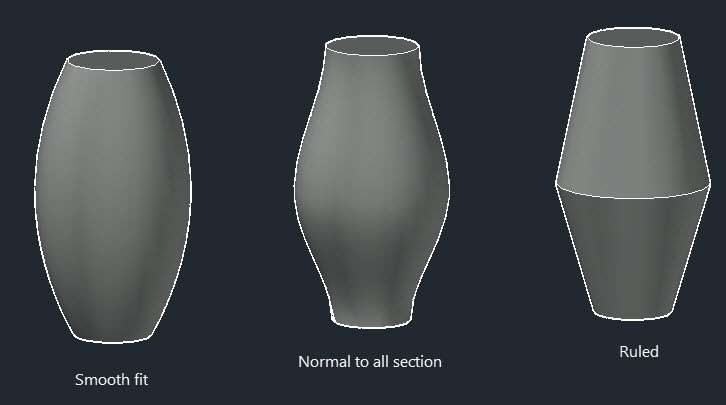
In these examples above when you start the loft command then select the geometries in lofting order and press enter you will see a small triangular shape which can be used to change the shape of loft at the point of contact with selected geometries.
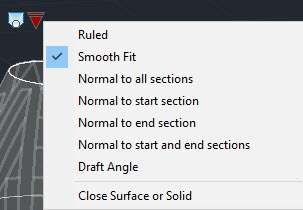
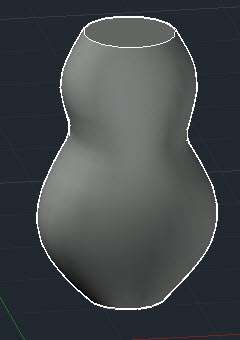
In this example, we have used the three circles of different radii on parallel planes and using the loft menu we can assign different variations of final Lofted shape to the geometry. These variations are shown in the image below, the lofting order is bottom circle to top.
A practical use of Loft
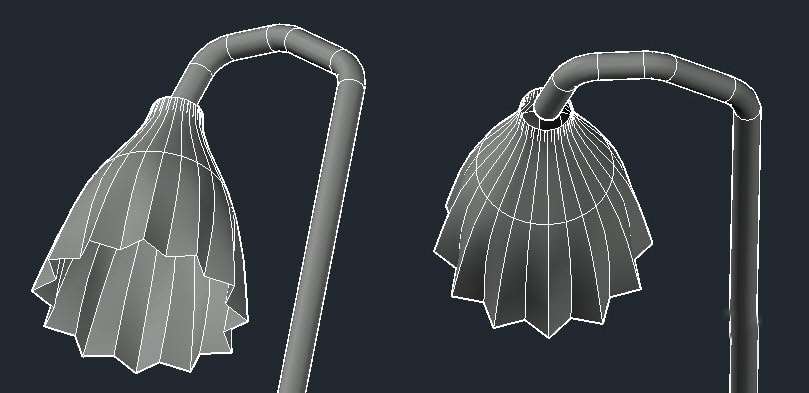
Using a combination of tools and features mentioned above you can create a complex 3D geometry which otherwise would take a lot of effort to generate using other 3D commands.
Once such example is this lamp post which has been made using Surface Loft command and three different geometries on parallel planes have been used to get this shape.
Do you have questions related to this article? Let me know in the comments below and don’t forget to share this article using buttons below.
How about a demo of “shelling” a 4-segment loft (say 4 circles lofted into a tube) to a shell thickness of 0.1″. For some reason I am unable to do this on Fusion 360 and Alibre Atom3d.
how to change the loft from smooth to straight
Thank you for sharing this kind of Information.
Muito boa a explicação, foi forma simples e eficaz
Very clear and complete explanation. Thanks so much
Hi ! I was looking at how can I loft a model boat that I have carved out.Carved it like how boat builder does theirs.I was looking at if someone could scanned it and get those 3D coordinates to cut the form work for the boat frame.However I wouldn’t mind learning lofting to build the boat like how you design these objects.Well I don’t know how to use CAD at all lol
I need to know more about lofting order
How does one end the loft smoothly. i have a very organic shape, lets liken it to a pebble sliced intoi layers to form it. The problem i have is the begining and end of the loft. How to i smooth it out to complete a natural looking shape?
Thanks so much Sir. I really appreciate will try it
Pls help me on how to loft intersecting tunnel…
Hello Engineer, please can you help with advantages and disadvantages of all the commands for 3D drawing in AutoCAD ?
MY AUTOCAD THE PATH SELECTION IS LOST IN LOFT COMMAND
how can use loft cut
really very useful command..
Thank you Mr. JaiPrakash Pandey
Welcome Mizan