
How to calculate area in AutoCAD drawings [Four methods]
There are at least four direct methods of calculating areas in AutoCAD drawing and in this article, I will show you all four ways.
If you prefer video then here it is, else scroll down for the complete article.
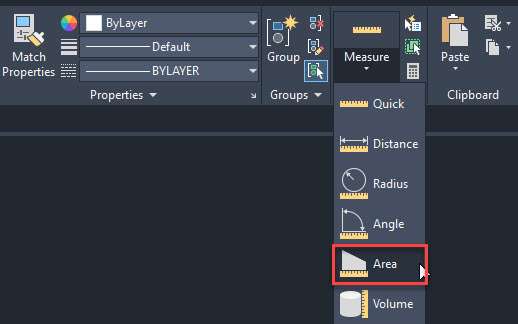
Method 1: Using the QUICK command
This one is a relatively new AutoCAD command which can find not only area but also length, radius, angle and several other geometrical properties.
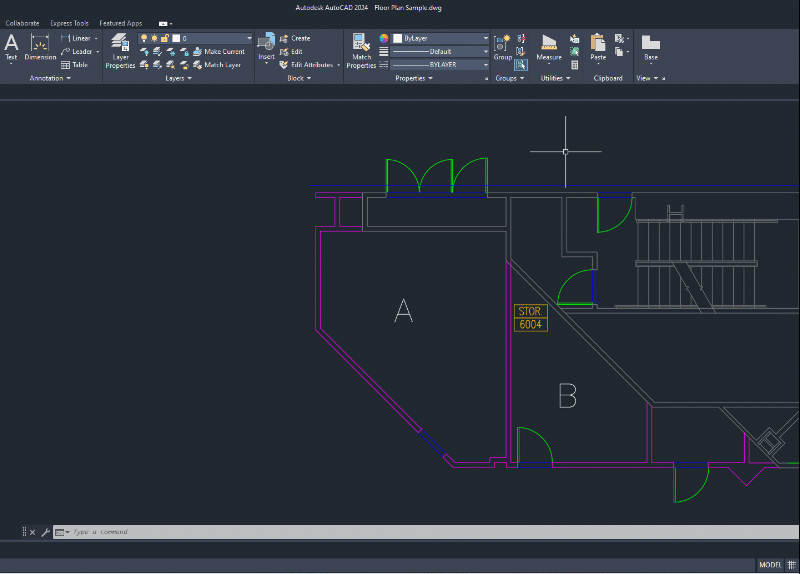
For our example let’s assume we want to find out the area of the region marked A in the following image.

To do that we will first hide the objects like the green door block and the yellow block in the top left corner of the room.
Select the blocks then right-click and select “Isolate” and then select “Hide objects”, these objects will hide and we will have a clean room.
Now select the Quick tool from the “Utilities” panel “Measure” flyout, you can also use the MEA command to activate the Quick measure tool.

Now click on the room and it will highlight in green showing the area of room A as shown in the following image.

To add more areas you can press and hold the shift key and then click on multiple regions of your drawing, these areas will be added to the existing area and the total area will show next to the cursor.
Once you are done finding the area of a drawing region you can bring back the objects we hid in the previous steps.
To unhide the objects right click anywhere in the drawing area then select Isolate and then select End object isolation and all the hidden objects will show up again.

Check the image above for reference.

Method 2: Using the AREA command
This is one of the most obvious methods of finding the area of a region in the drawing.
In this case, let’s once again take the example of the previous drawing and now we will again find the area of the room marked A.
But this time we don’t need to hide any object from the drawing view.
Select the AREA command from the Measure flyout of the “Utilities” panel as shown in the following image or you can use the AREA command.
Now Click on the points making the edges of room A and when the entire room is selected press enter key.
If you want to find the area of multiple regions like room A as well as room B together then you can follow the following workflow.
Start the area command from the Measure flyout or use the command AREA.
Click the Add area option from the command line and then click on all the points making the boundary of room A and press enter key.

Now click on on the points making the boundary of room B and press enter again.
The final area of both regions will now show up on the command line as shown in the following image.

Similarly, if you want to subtract the area of a region from the calculated area then you can follow the following workflow.
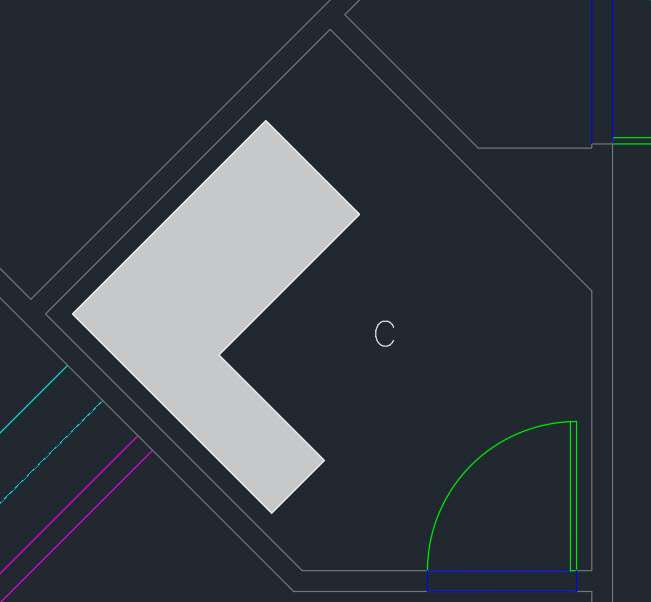
In this example let’s find the area of room C as shown in the following image excluding the area of the table shaded in grey colour.
To to that start the Area command from the Measure flyout of Utilities panel of use AREA command.
Now select the Add area option from the command line and then click the boundaries of room C and then press enter key.
Now click the Subtract area option on the command line and then click the boundaries making the table in room C and then the total area will show up on the command line as shown in the following animated image.

Method 3: Using Hatches
This is an unconventional yet easy method of finding the area in AutoCAD.
It is especially helpful in situations where the AREA command is slightly difficult to use like rooms or regions with rounded corners.
In rounded corners, you can’t use the AREA command directly because it prompts you to select the corner which does not exist in a room with rounded edges.
You can use the “Object” method of the area command to find the area of these kinds of regions which I have explained in the next method.
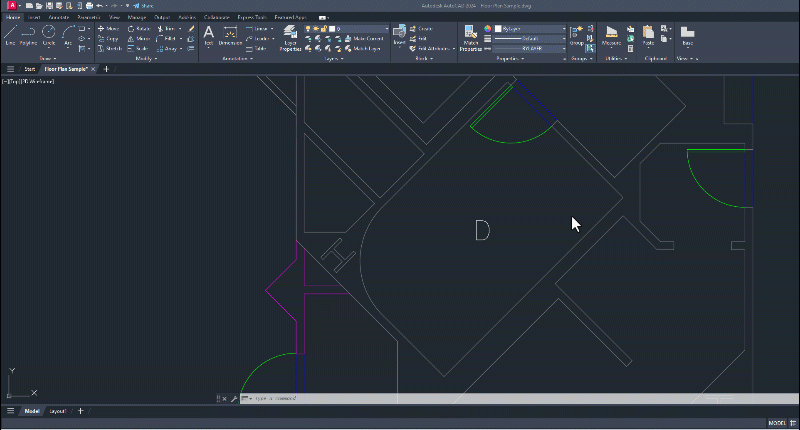
For now, let’s find the area of Room D as shown in the following image using the hatch command.

Start the hatch command from the Draw panel of the Home tab or use its command HATCH.
Select any hatch pattern from the list of hatch patterns and then click on room D, I am using the “angle” hatch pattern for this example.
Make sure you include the regions covered by the door as well if you want the total area of the room as shown in the following animated image.
Now select the hatch pattern, if it’s one hatch or select all the hatches if the hatch is made in three parts and then right-click and select the properties option.
Now scroll down the properties palette and there you will find the Area field as shown in the following image.

This area includes the area of the region that apparently seems to be ignored around text D, so you don’t have to worry about the accuracy of the area calculated using this method.
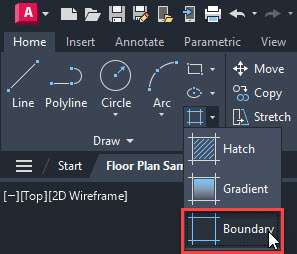
Method 4: Using the Boundary Command
This is yet another unconventional method of finding areas in AutoCAD.
You can make a boundary using a polyline or region and then find the area of that polyline or region which will also be the area of the region.
In the following example let’s find the area of Room E using this method.

We will start by hiding the objects like blocks, text and the door from the room so that we have a clean room for the next steps.
To hide the objects select them from the room and then right-click and select the “Isolate” option and then “Hide objects” from the context menu.
Now select the boundary command from the hatch flyout of the Draw panel on the Home tab as shown in the following image.
Now select the “Polyline” option from the Boundary creation panel and then click the Pick points option as shown in the following image.
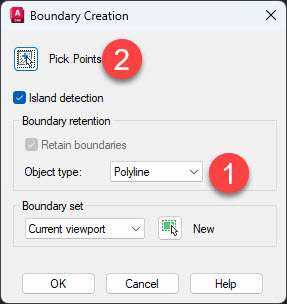
Now click inside room E and a new polyline boundary will be created.
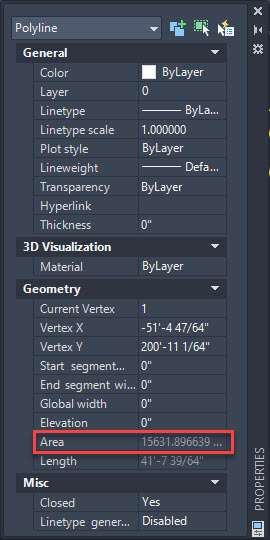
Select this newly created polyline and then right-click and select the Properties option.
Now scroll down the properties palette and the area will show up as shown in the following image.
You can also select the AREA command and then click on the “Object” option from the command line and then click the boundary created in the previous steps and the area will show up on the command line.

Once you are done checking the area you can delete the boundary and unhide the objects like blocks and doors hidden in the previous steps.
To “unhide” the objects simply right-click anywhere in the drawing area and then select the “Isolate” option and then select the “End object isolation” option from the context menu.
Conclusion
Finding an area is easy and straightforward now in AutoCAD thanks for the Quick command and this is the option that I would recommend you use as well.
For any specific situation, you can use the other methods mentioned here.
Did you know about all these methods of finding areas in AutoCAD? let me know in the comments down below.
Never knew the last 2 methods. Thanks for sharing.
HI Mr. Pandey,
Thanks for your time. I was wondering if there are companies that you can send a set of prints (pdf’s) to that will calculate the sq. ft. room by room and export the other date for each room as well (Building, Floor, Room Description and of course the sq. ft. that is missing form the prints)? I have a client that need us to migrate this date into one of our databases.
Good Morning Mr. Jayaprakash
Can you explain in short as to How I can find the Areas of classrooms individually in a floor plan.
I have a plan showing all the areas of each classroom, and I am trying to find out from the drawing.
Please, advise me as to how do I calculate and place the sq. ft numbers in the location as in a block etc..
My name is also Jayaprakash. with a last name Vanga, from Hyderabad.
great and what about in road cross section
short command of area in autoacd
Command “AA”
Yes, best. And thanks for given right information
Hi , the best way is to use region.
I understand no further questions about this topics
Also have one question
How to find developed length in bending drawings
I think it would be so usefuI think it would be very useful if Autocad had a command that, when clicking on a closed polyline, the program automatically created a leader with the area of the object. I consider it a great improvement for a new version. When a project needs to work with an inventory of areas, better visibility of each region in the drawing would help a lot.
That could be done with a simple LISP routine.
Hello,
How can i show the dimension in the plan so the area dimension changes with the update of a polyline?
Simply Su8per
hey jaiprakash , how to calculate area in sqft & sqmt ?
Hello Jaiprakash,
I have a question about areas. We had a drawing at work and someone in our office calculated the area by using a polyline, then another person calculated the same area by hatch. They both came out with different areas, do you know what would cause that? Is it better to calculate by hatch or by area?
Thanks,
Keith
First off, the best option is to always let autocad do the math for you. I would pick the hatch for a reliable source. If someone did manual calculations on the polylines, there is room for human error. Or the polylines could have been on a z value which increased the total length.
Also try joining the polylines using join or PE (M) – Join. Once the lines are all joined and if they are a closed polyline, the total area will appear in properties.
I should posts and add on article on how to use tables to add areas to other areas and use the code to paste into a seperate table.