
How to add materials on solid body and faces in AutoCAD
In AutoCAD, we have a comprehensive library of materials and you can add material to any 3D solid object with a simple drag and drop.
You can also create your own custom materials in AutoCAD to give it a completely personalized appearance.
And if you like you can even make a complete photorealistic house with interior and exterior renderings as shown in this course.
Though you can apply materials to the entire object using default options there are some workarounds that you can use to apply materials to selected faces of 3D objects as well.
And in this article, we will explore all these methods of applying materials to objects and selected faces too.
Adding material to 3D solid
In this example, I will use this Oldham’s coupling 3D drawing and add materials to it.

Switch to the 3D modeling workspace, you can do that by clicking the gear icon on the bottom right of the status bar and then selecting the 3D modeling option from the list.

Now go to the visualize tab and then click on the Materials Browser icon on the Materials panel.

The Materials Browser palette will open with a list of materials available for you which can be used in the drawing.
Now expand the panel on the left which says Home and you will get a categorized list of materials.
Clicking on a particular category from this panel will show only materials of that category in the Materials Browser palette.
For example, selecting Wood will show only wood materials in the palette as shown in the following image.
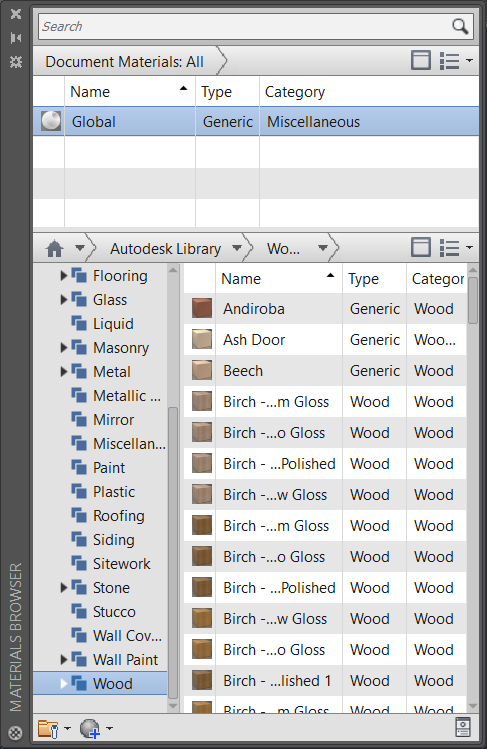
This will help you in sorting through the list of materials and in finding the right one easily.
This list is pretty comprehensive with lots of materials but if required you can also make your own custom material in AutoCAD.
Now adding material is as easy as drag and drop.
Just find your material from this browser and drag the material and drop it on the object to which you want to add.
Alternatively, you can also select the object(s) first and then right-click on the material you want to add from Materials Browser and then select Assign to Selection from right-click context menu.
After adding the material make sure your Visual style is set to “Realistic” and “Material/Texture On” is active as shown in the animated image above else the material effect will not be visible on the objects.

Adding Material to the Face of the Object
As you must have noticed here that the material is applied to the entire object by default and this method can be limiting sometimes when you only want to add material on any selected face.
For example, if you have a wall where you want to add different paints to the interior and exterior you can use this method.
Here I will use a simple rectangular 3D solid wall and I will apply Pink paint material to one side of the wall and Blue color to the other side.

The workflow will be a little different here.
In this case, once again go to the Materials Browser palette and find the materials that you want to add to the wall.
Select Paint from the material category and then hover your cursor on the Pink paint and click on the arrow as shown in the image below.

This will add the material to your active list of materials on the top of the Materials Browser palette.
Now right-click on the Pink material on the top of the palette and select Rename from the context menu and name it A.
Similarly, go to the Wall Paint category and add Cadet Blue color to the top of the Materials Browser palette by clicking the arrow as shown in the image above. Rename this material to B.
In this case, I am asking you to rename the materials as it will simplify the process of adding the materials in upcoming steps.
Now we are all set to add Material A which is Pink and Material B which is Blue to different sides of the wall.

Type SOLIDEDIT on the command line and press enter then select Face from the options of the command line and then select mAterial from the next set of options.
Now AutoCAD will prompt you to select the faces, click on one of the faces and press enter.
Now command line will prompt you to type the name of the material you want to add to this face, just type A and press enter three times to exit the command.

You will notice that the material will now be added only to the selected face and since we already simplified the name of the material using a small name “A” you won’t need to type in the complete name of the material.
Once the material is added to the face you can rename it again to any name which is easy to remember.
Also, make sure the visual style is selected as “Realistic” and “Materials/textures On” is checked in the Materials panel.
Similarly, repeat the steps for another side of the wall but use material B this time.
Summary
So these are some of the basic methods of adding material to any solid body or face and there are also other ways of adding materials to a set of objects like applying the material to layers in AutoCAD.
You can also add decals in AutoCAD to create a logo on an object and use images as a surface too.
I hope you will find this article helpful, if you have any questions let me know in the comments below.
Liked it
I will use first then will comment in detail.
How to add company loggo or picture on surface 3d object autocad not material just look like sticker of brand
Shall I contact you
I added material to faces but it does not displayed in render mode. :(
I have the same question as another post – how can I do this so that it will export into an STL for 3d printing?
Great Post.
How does one do this so it will export into an STL file for 3D printing? (I want to print a roughened stucco shape with actual texture)
I want to contact you pl give send your conatct number on 9426622207 and 8511215246
thank you for blessing lives
Shall I contact you if so sent your contact⁹
Great tips for drawings that will be presented. Materials in AutoCAD are not necessarily used in the same format as materials used in Revit
Nice Post by by Jaiprakash Pandey